介面設計 - XAML
XAML 語言我們會在後面詳細說明,這個章節是讓初學者先快速做一個簡單的範例,而有個宏觀的概念。所以這邊我們先直接在原本的 Grid 中增加下面幾行 XAML,如下:
<Window x:Class="bmiwpf.MainWindow"
        xmlns="http://schemas.microsoft.com/winfx/2006/xaml/presentation"
        xmlns:x="http://schemas.microsoft.com/winfx/2006/xaml"
        xmlns:d="http://schemas.microsoft.com/expression/blend/2008"
        xmlns:mc="http://schemas.openxmlformats.org/markup-compatibility/2006"
        xmlns:local="clr-namespace:bmiwpf"
        mc:Ignorable="d"
        Title="MainWindow" Height="350" Width="525">
    <Grid>
        <StackPanel Margin="10">
            <Label>身高</Label>
            <TextBox></TextBox>
            <Label>體重</Label>
            <TextBox></TextBox>
            <Label>0</Label>
            <Button>計算 BMI</Button>
        </StackPanel>
    </Grid>
</Window>
XAML 標籤的格式是:
<標籤 屬性1="參數1" 屬性2="參數2" ....>
</標籤>
這邊先簡單講解上面用到的標籤:
| 標籤 | 說明 | 使用的屬性 |
|---|---|---|
| StackPanel | 讓內含元件依序往下排列 | Margin 外距範圍(留邊) |
| Label | 文字 | |
| TextBox | 輸入框 | |
| Button | 按鈕 | Height 高度 |
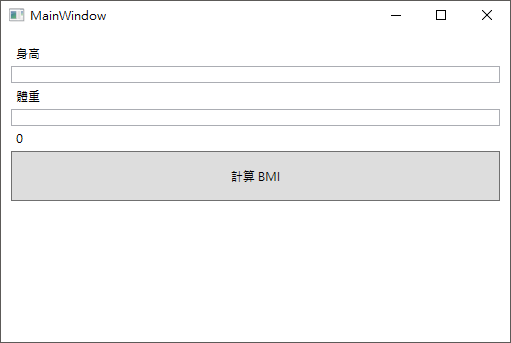
執行後你會看到如下畫面:

加入 x:Name 屬性
設計完介面後,為了讓 C# 程式能控制我們的介面元件,所以必須給元件一個特別的屬性叫做 x:Name="名稱"。有了這個屬性,程式就可以用該名稱去控制元件了。
所以我們在需要被程式控制、存取的元件中加入 x:Name
<StackPanel Margin="10">
    <Label>身高</Label>
    <TextBox x:Name="heightTb"></TextBox>
    <Label>體重</Label>
    <TextBox x:Name="WeightTb"></TextBox>
    <Label x:Name="bmiLb">0</Label>
    <Button Height="50" x:Name="countBtn">計算 BMI</Button>
</StackPanel>
這樣我們之後的程式就可以用 x:Name 指定的名字去控制這些元件了。